

Using Group Permissions To Create An Efficient & Collaborative System

Mar 28, 2022
3 min

At OpenAsset, we champion transparency. We know that firm-wide access to your DAM platform has a range of benefits, including increased awareness of available assets, fewer barriers to asset usage, and increased knowledge sharing. However, we also understand that too much access can be problematic. If all users across a firm have unbridled control over assets, disorder can follow. Files might be uploaded into the wrong categories, keywords may be tagged incorrectly, and quite rapidly, the system can become disorganized and inefficient.
Permissions are an excellent way to mitigate these risks. By connecting your team to the relevant features they need, Permissions ensures users zero in on their tasks at hand, with minimal distractions. This results in users deriving value from OpenAsset quickly and allows for better collaboration between administrative gatekeepers and general users. In this blog, we’ll cover what Permissions are, how they’re applied to Groups, and offer some best practice tips about how to use Permissions to your advantage.
What are Permissions & Groups?
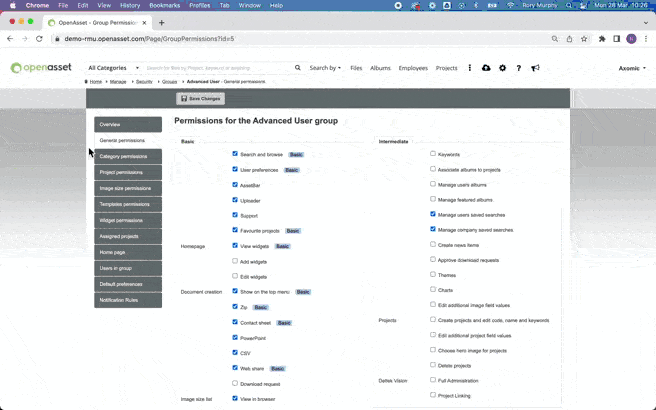
Within your team, people will use OpenAsset for different workflows. Some users may need to upload files, while others may only need to access and use these images. Permissions help to simplify people’s workflows by ensuring that they only have access to the features they need in order to complete their tasks. These can range from high-level feature access, such as the ability to upload a file, to more granular access, such as specifying the image size a user can download. Permissions can be edited via the following pathway: Settings > Security > Groups > Edit Groups.
Permissions are assigned to Groups of users. Groups are a helpful feature for two reasons. Firstly, they create a simple categorization for users; each user can be identified under a certain bucket – eg. ‘admin’, ‘general user’, ‘advanced user’ etc. Secondly, Groups create time-saving benefits. Compared to assigning Permissions at an individual user level, Groups allow you to quickly edit and apply Permissions for multiple users in one action. Learn more about Groups and the different Permissions available, here.
Best Practices for Creating Groups
Before creating your Groups, it’s worth taking some time to think about all the different ways users will need to interact with OpenAsset, including any specific niche use-cases. From there, you can think about bucketing users into Groups and what Permissions should be applied to each. Visualizing this on a mind map can be a good first step. If you have users already utilizing OpenAsset, this task can be made easier by taking stock of how your different users interact with the platform and then creating user segments from this information.
When it comes to the process of creating Groups, it makes sense to start with your most basic-level users. Once you’ve created this Group and added its Permissions, you can then ‘clone’ this Group and iteratively add more Permissions for the next Group. Cloning groups will ensure all of the Permissions are carried across, meaning you don’t need to start from scratch each time. The screen recording below shows how you might clone a Group to create a ‘Super User’ Group from a ‘General User’ Group.

Use-Case 1: Guiding Users to their Needs
One example where Permissions are helpful is in the act of guiding users to the File Categories that are relevant to their roles. Not only does this provide users with a more streamlined product experience, but it also removes the risk of users performing actions on irrelevant Categories, which in turn might jeopardize the system. If every user across a firm were able to upload, edit and delete files across all Categories, errors would be likely. Category Permissions are an excellent way to keep users on track.
Let’s use an example to illustrate where this may be helpful. Let’s say your company has an in-house graphic design team whose job is to create marketing materials and sales enablement documents. You will likely want to assign this graphic design team to its own Group, and give them full access (view, upload, edit, and delete) to a ‘Marketing Materials’ category. This will allow them to utilize current marketing materials and upload their new designs to the platform. You may also want to give them access to the ‘Projects’ category, as they may need to use project imagery in their marketing designs. However, unlike ‘Marketing Materials’, where they have full access, you may want to only give them View capabilities for Projects. This ensures that they cannot accidentally tamper with the original Project image, nor mistakenly upload files to the Project category.
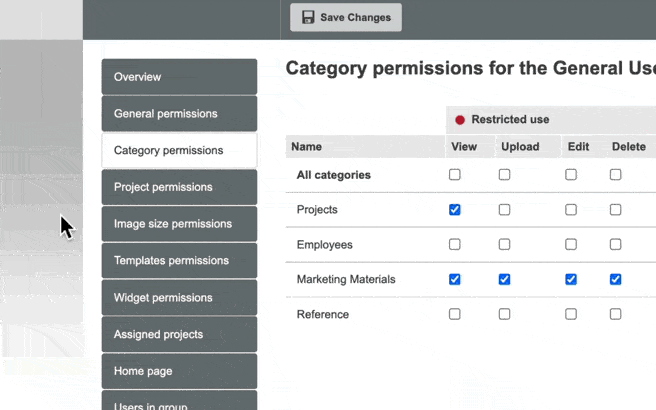
In most cases, we would recommend allowing View access across all categories. This creates a more transparent system, and thus creates useful knowledge-sharing benefits, as outlined in this blog. However, there may be occasions where no visibility should be granted. For example, you may want to hide confidential images or documents from an external 3rd party. Again, Category Permissions can be a useful way of excluding this information.
Use-Case 2: Allowing for User Input while Maintaining Quality Control
Another way in which Permissions can help streamline processes is in the task of gatekeeping certain tasks. Gatekeeping processes within OpenAsset are often a fine balancing act. On the one hand, it’s good practice for an admin to have sole control over certain tasks. This is often key to maintaining quality and consistency in the system. On the other hand, this sole ownership can be onerous and time-intensive. A solution for this is to allow for regulated user input, which can be set up via Permissions. There are three common use-cases where this is invaluable.
Upload approvals are a great example of the benefits of regulated user input. Let’s say that you are the admin of your team’s OpenAsset account and you want to check over assets before they are uploaded into the Projects category. Maintaining a high-quality Projects library is important to you, as these images are frequently shown to clients as examples of past work. Instead of having your team send every Project image to you to examine and upload yourself, you can instead set upload Permissions. This means that the work of uploading files is spread out across your entire team while ensuring that you maintain quality control via the approval process. In OpenAsset, the default setting is that uploads are routed to an approver, but you can add exceptions via the Category Permissions page.
Another example in which admins can set quality controls while allowing for user input is via Keyword tagging. By splitting out the tasks of managing the system’s Keyword Taxonomy and the actual tagging of Keywords, admins can ensure that they are in control of which Keywords are available for use while allowing for general users to apply them. This distinction is important. Admins can ensure only a limited number of relevant keywords are available, assuring an orderly system. Meanwhile, general users are free to actually tag the files, effectively crowd-sourcing this otherwise time-consuming task. The ability to add new Keywords and Keyword Categories can be toggled on in the Intermediate section of General Permissions. The ability to tag Project Keywords can be toggled under General Permissions > Intermediate > Projects, while the ability to tag Files can be toggled by enabling Edit in the Category Permissions page.
A final example where user input can be invaluable is within the Employees section. Admins may decide to give users Edit permissions for Employee information, allowing users to keep their Employee photos, Projects, and qualifications/certifications up to date. This ensures this task is spread out over a team, instead of falling solely on an Admin. One caveat to note here is that currently, this Edit permission is not specific to the user’s own Employee profile.
Getting Started
As we’ve seen with some tangible examples, Permissions are a powerful tool. Not only do they offer users a frictionless experience by providing them with the relevant features to do their job, but they can also create a more collaborative platform by enabling user input while maintaining quality control.
To learn more about Permissions and Groups, feel free to contact your Customer Success Manager, or contact general support, here.
Landon Iannamico is a content marketing expert with 6 years of experience helping B2B SaaS brands tell their stories and establish their verbal identities. He specializes in crafting brand narratives and producing content that breaks down complex concepts for highly specific, knowledgeable audiences across the data, AI, and engineering industries.