Often the simplest tasks are the most tedious. Editing your images and documents is a prime example. Whether you’re an expert in the Adobe Creative Cloud, or whether you still use Microsoft Paint (we hope not!), even the most basic changes can take time and effort. From importing and exporting the assets, to choosing a new name and folder for the edited file, there are a number of steps that prolong the process. While each edit may only take a few moments, this time can quickly accumulate when dealing with multiple files. Ultimately, these processes divert your energy away from your end goal – showcasing your work to the world.
With OpenAsset, these additional steps can be avoided. From reformatting image sizes to editing your PDFs, our inbuilt tools help to streamline your workflows and take the stress out of asset usage. Let’s figure out how.
Image Resizing, Reformatting & More
Resizing and reformatting your images are two tasks that are likely performed by your marketing team on a regular basis. Unless your team is experienced in graphic design, these seemingly simple actions can be intimidating. For instance, they might be confused about how pixel sizes correlate with DPI, or how a PNG differs from a TIFF. OpenAsset’s in-built Image Size settings negate these problems. By creating preset options that are automatically made available to all users, your team can download your assets in a range of sizes, formats, and even color scales, with the confidence that these assets will be high quality and ready for use. Even if you’re the most efficient graphic designer, these inbuilt tools will save you the time and effort otherwise needed to rework your assets in a separate platform. These image sizes are viewable on the sizes tab on the file info page and allow you to directly download or share your asset in the reworked size/format. Let’s see some examples where these settings might be useful.
Image Sizes
Whether you’re using your images for your website, social media, or sales enablement docs, image size presets can ensure these assets are downloaded at the exact quality and dimensions you need. Let’s say you’re preparing a sales presentation and need to pull a number of images into a deck. Using the original hi-res image sizes would overload your file memory, impacting the ability to share it with colleagues, and increasing the time it takes to load. Instead, you could create a Powerpoint-specific quality Image Size that would fit your slide formats and is of high enough quality without unnecessarily clogging your file.
Another scenario would be creating an Image Size specifically for social media platforms – for example, a portrait format preset for Instagram Story posts. When doing this you’ll want to consider toggling the ‘Crop to Fit’ function. Enabling this setting will crop the image into the correct dimensions, while disabling it will create white space around the asset so it conforms to the size required. Because each image may need to be cropped in different ways, we recommend also considering crop presets (discussed in the next section) as another option for creating social media assets.
File Formats
Another area in which Image Size settings can help is in the action of reformatting file types. This can be particularly helpful for graphic design teams, who typically need their assets in a lossless format, such as TIFF. Instead of providing them with a PNG file that they would need to convert to TIFF, you can allow them to download files in TIFF format directly from OpenAsset. This reduces the time wasted manually reformatting the file and allows your design team to get to work without any barriers.
Color scales
Image Size settings can even allow you to select your required color scale when downloading a file. This is particularly helpful if your firm often sends assets to print, as different formats can produce very different results. Within OpenAsset you can export into CMYK, RGB, and Grayscale formats.
It’s worth noting that you can use Image Size Permissions to control what Image Sizes are available to each user. This can help guide users to the sizes and formats relevant to their role. For example, you may choose to limit graphic designers to only being able to download in TIFF format.
Image Cropping
Even the most basic tasks, such as cropping images, can be improved with OpenAsset. Our inbuilt cropping tool provides some sophisticated features that can make your download process more efficient. Image dimension tools, zoom features, and presets can all streamline your workflows, as we’ll illustrate in the example below.
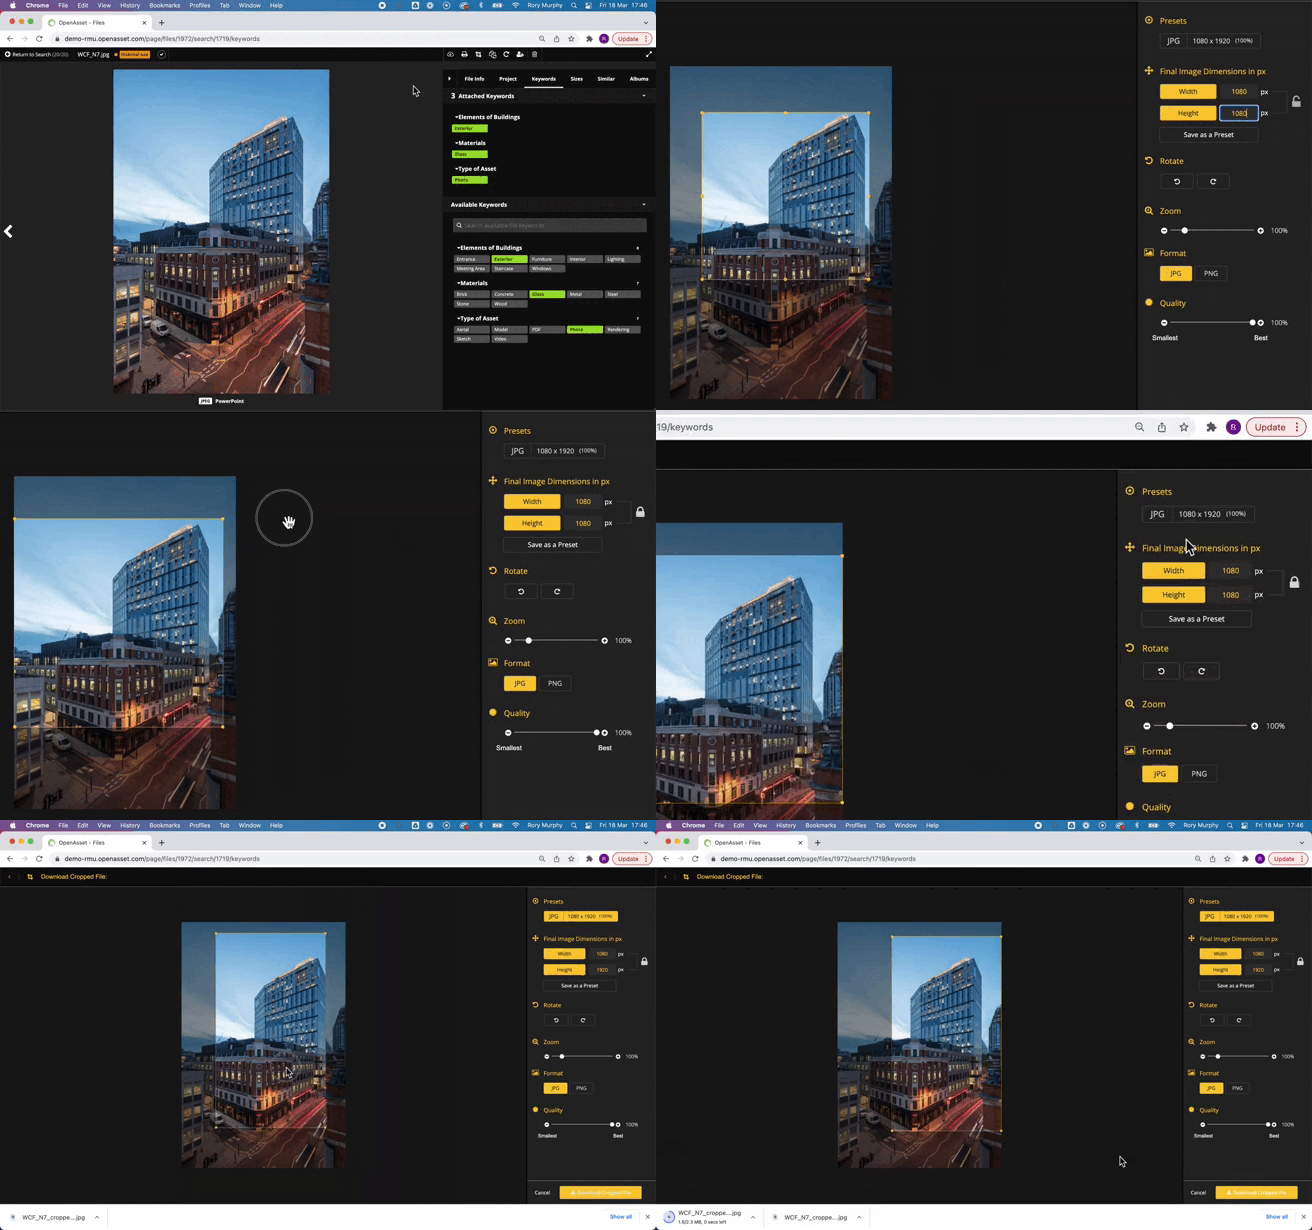
Let’s say you’re managing your firm’s Instagram account and want to download some images to post on your feed. You know that it’s best practice for your post to be 1080 x 1080 pixels, and with the image dimensions tool, you can easily toggle to this exact size. You can then lock the aspect ratio by clicking the padlock icon and scale the crop area up or down if needed. Using the 500x zoom tool while cropping, you can make delicate edits to the crop frame, ensuring all the key features of the image are kept in shot. You can even change the format (PNG or jpeg), rotate the image, and adjust the image quality. Once you’re happy with your crop, you can then save it as a preset. This last step is an important one. Saving as a preset will ensure that future images can be cropped with the exact same specs at the touch of a button, resulting in huge time-saving benefits. The advantage of this versus creating an Image Size (described above) is that it allows you to view and make edits to the crop area prior to downloading.
After downloading your ‘Instagram Post’ asset, you might switch to an ‘Instagram Story’ preset you’ve already created, and hit download again. This will quickly give you the freedom to post in multiple formats. The recording below shows how you can create a square Instagram post, and then use a ‘story’ preset to allow you to create two formats within just 30 seconds.

While cropping is hardly the most complex editing tool, it’s easy to see how doing this within OpenAsset can improve your workflows. With the help of the preset functionality, your assets can be downloaded in a standardized format in a matter of seconds.
PDF Tools
Alongside features that streamline the editing and usage of images, OpenAsset also facilitates the reworking of PDFs, in the form of merging and splitting documents.
Merging PDFs
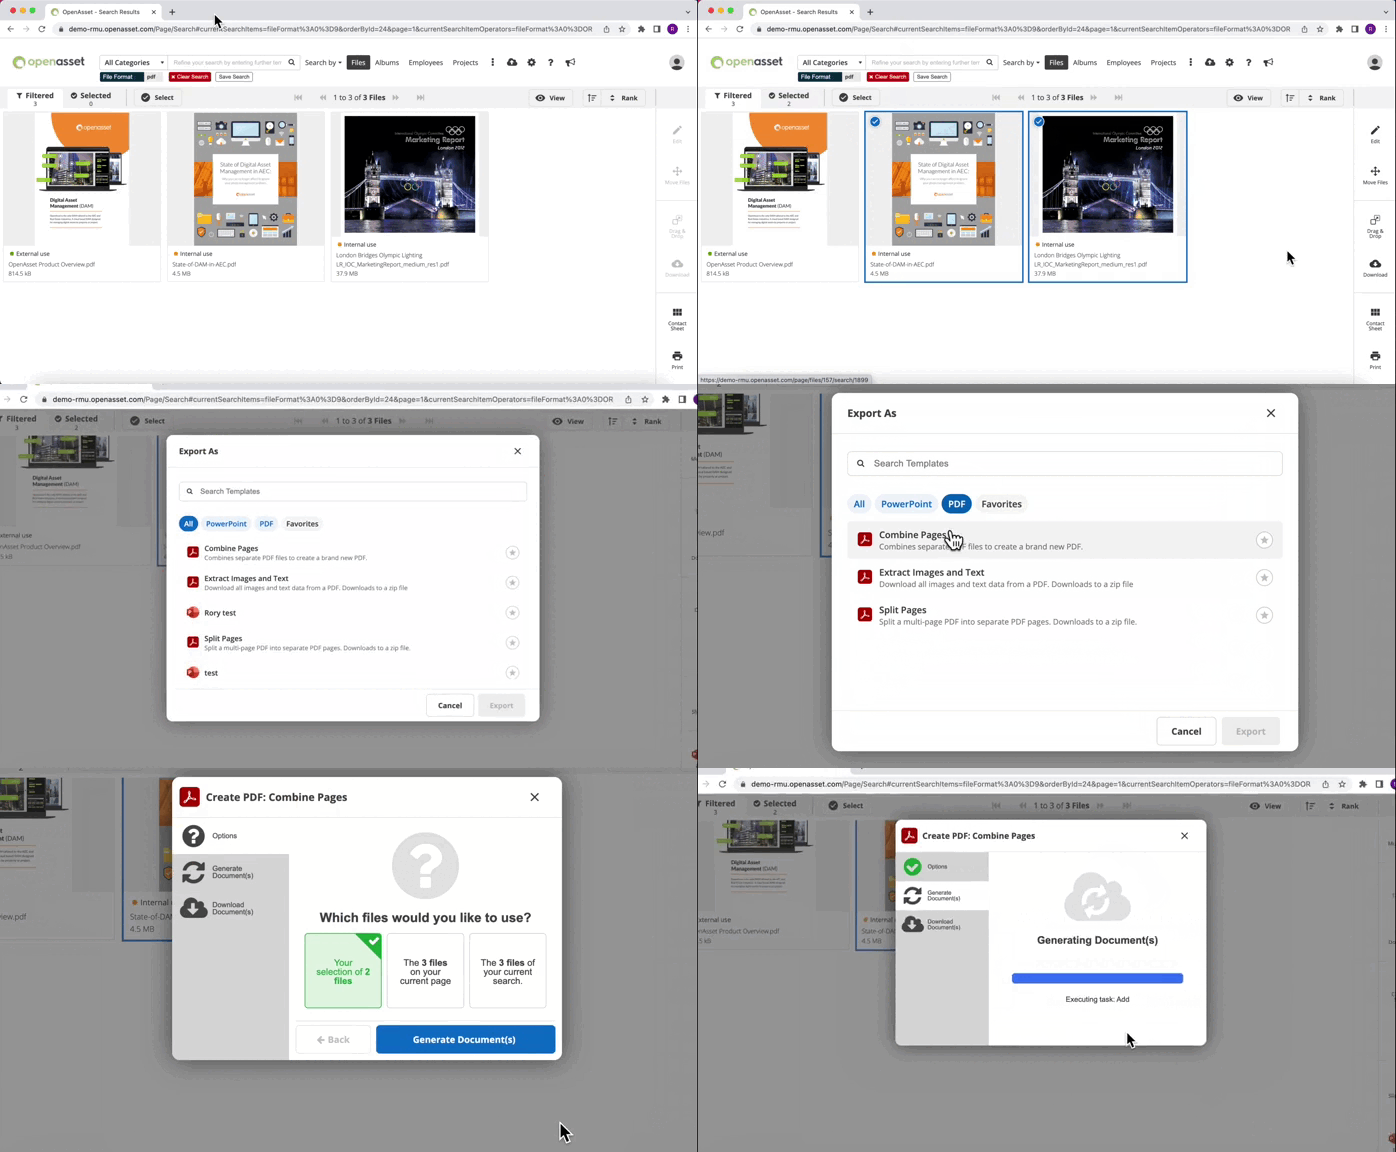
Merging PDF files is an especially helpful feature in the process of building your proposal documents. With your firm’s brochures, case studies, project overviews, and more hosted in OpenAsset you can cherry-pick the relevant content and piece together a customized proposal in seconds. To do this you’d simply select the PDFs in the order in which they should be merged, click the PDF icon, and hit ‘Combine Pages’. This can be particularly helpful for users without an Adobe license, but it even saves time for those who do.

Splitting PDFs
On the flip side, OpenAsset can be used to split your PDF files into the pages it comprises. This can be beneficial if you need quick access to a specific page without requiring the full document. Again, this is particularly useful for those without an Adobe license.
Getting Started
While OpenAsset certainly doesn’t claim to be your one-stop editing solution, our in-built tools can simplify your processes and make those basic, but time-consuming tasks a thing of the past. To continue reading about streamlining the usage of your assets, this templates blog covers some additional workflows.
If you’re interested in learning more about how OpenAsset’s in-built editing features can make your day-to-day tasks easier, feel free to contact your dedicated Customer Success Manager or reach out to support, here. Our team can help you create new image sizes in your system and also reprocess existing images if needed.


