OpenAsset is purpose-built to enable AEC companies to get the most out of their assets. However, that doesn’t mean the platform is perfectly configured for your company straight out of the box. We realize no two businesses are the same, and therefore no two platforms should be the same either.
The good news is OpenAsset can be easily customized to work for your specific business. By tailoring your platform’s keywords and fields to meet your company’s needs, you will ensure that users will be able to access your files easier and use them seamlessly in applications. In this blog, we’ll discuss the best practices for custom keywords and fields, and how to actually apply these system changes.
Prioritize Your Project-Related Configuration
Before going into the weeds of how best to configure your system it’s worth taking a moment to remember the importance of project-level data. As part of OpenAsset’s taxonomy hierarchy, any file associated with a project will inherit the keywords and metadata applied to that project. For example, if 10 files are attached to a project with the keyword, ‘Skyscraper’, all of those files will now be accessible via that keyword. This means that rather than individually tagging, say 5,000 files with keywords, you can instead apply keywords to the 100 parent projects they live under. This can save countless hours and is a key reason why you should prioritize configuring project data first. Since users can also search via field data (as long as the admin has enabled the field as ‘searchable’), this concept also applies to custom fields.
A final reason why you should pay special attention to project data is that this is how your users tend to search. In fact, 90% of OpenAsset’s searches are project-focused – with users navigating to files either from the project page or via project keywords. With this information in mind, let’s take a look at some of our best practice tips.
Custom Keyword Best Practices
Creating your keyword list is an important part of setting up your system as searching via keywords is how your files will most commonly be found. While keywords can always be edited or deleted, you should try to avoid too many changes so that users can familiarize themselves with a standardized taxonomy. We’ve outlined some best practices to help you nail your keyword structure from the get-go.
- Use language your firm is already using. The whole point of keywords is that users should be able to search for them easily, so using terminology your team is already familiar with is a no-brainer. If you’re unsure if one word or phrase should be used over another, speak to the end-user and ask what they would search for. Alternatively, include both words separated by a slash (eg. bathroom / restroom) – this will make both words searchable from one keyword tag. If you’re still stuck, look to utilize wording from your website or language from your marketing docs or proposals.
- Don’t be too granular. The objective of keyword searches is to create a broad, useable selection of images. Being too detailed with your keywords will result in a very narrow list of results. This may be beneficial when you know the exact image you want, but very limiting when you’re browsing for a range of images to choose from. Being too granular will also create more manual tagging, potentially making your file management too difficult, and defeating the purpose altogether. One problem you may encounter is adding numerical information, such as the size of the project, or capacity of building, as keywords. Instead of adding the specific data here, you can aggregate the data into ranges. For example, instead of adding exact capacity data, you may want to add categories for small (<100), medium (101-500), and large (500+).
- Less is better than more. When you start building your keyword list, it can be difficult to toe the line between improved accessibility, and too many keywords confusing things. Of course, we’re always on hand to help in specific circumstances but our general recommendation is to err on the side of less. You can always add keywords or keyword categories in the future, but taking them away may confuse your team and disrupt their processes.
Creating Keywords
Note that you will need admin rights in order to manage your firm’s keywords.
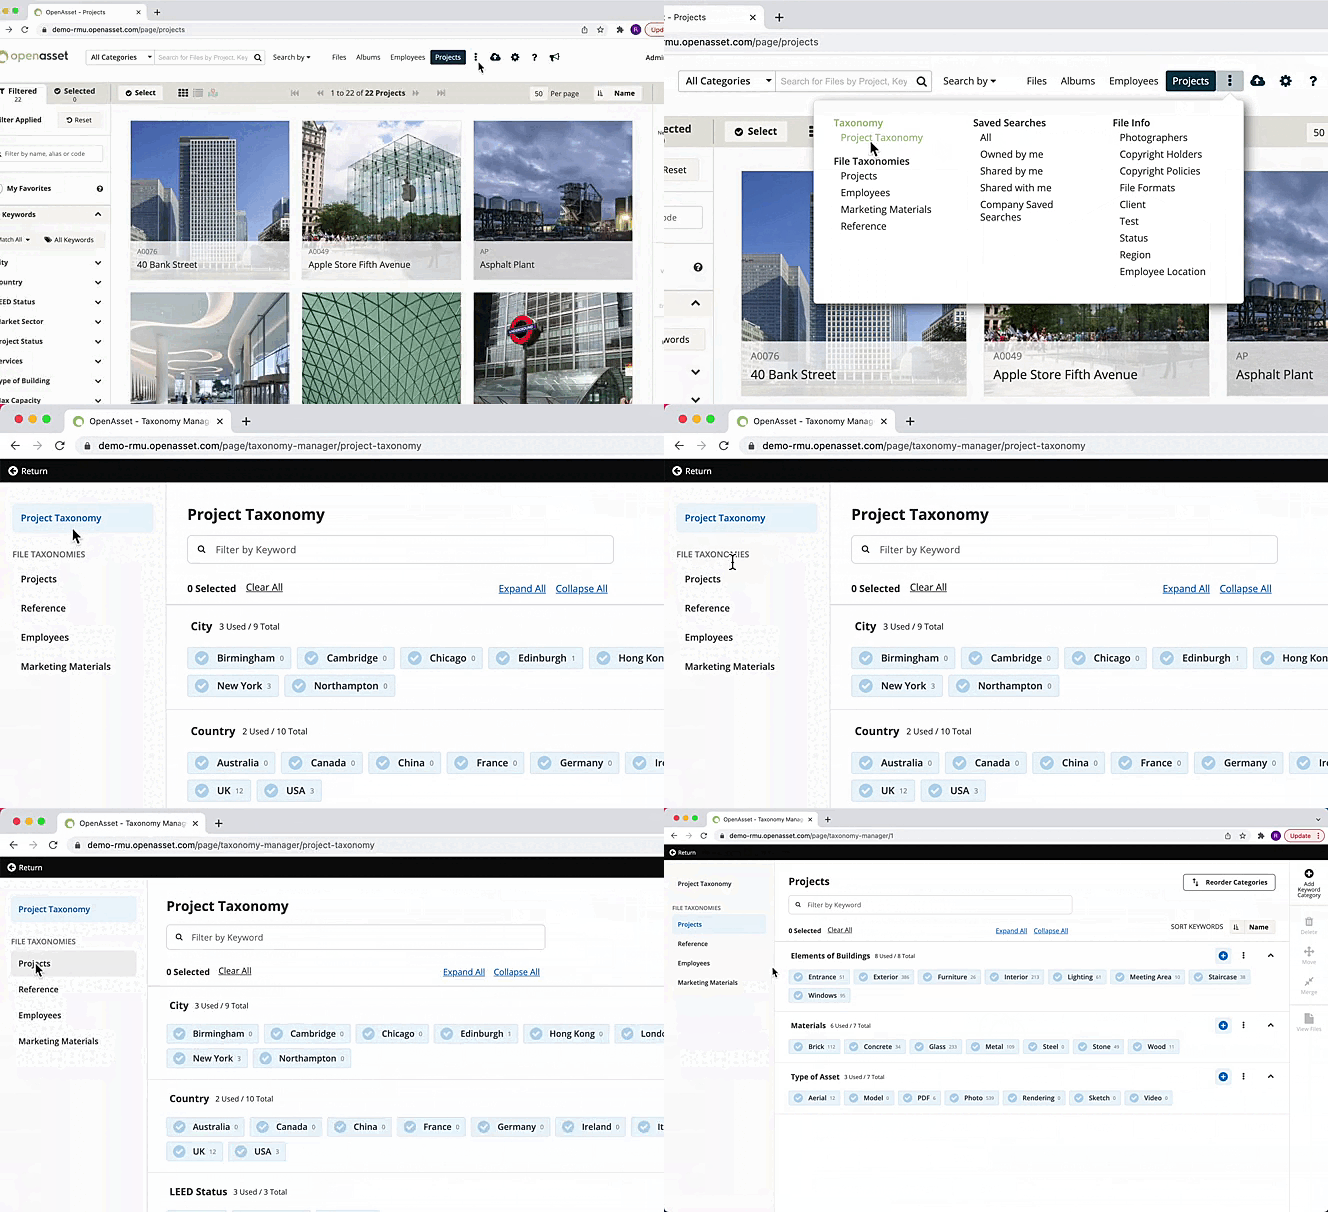
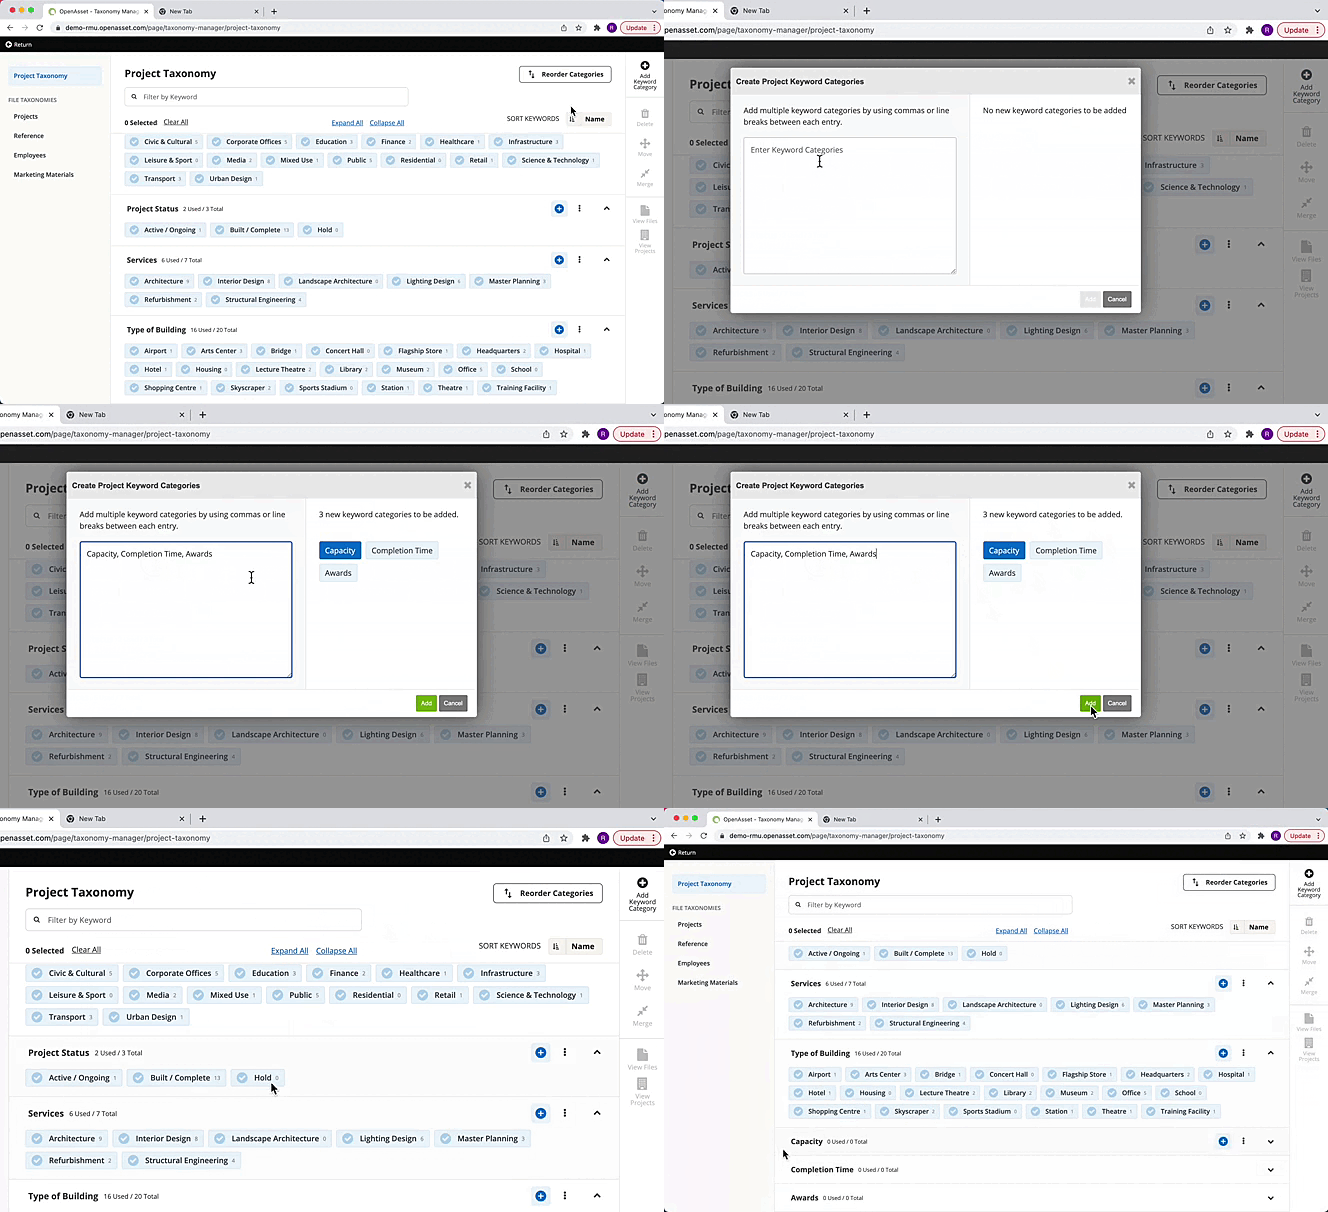
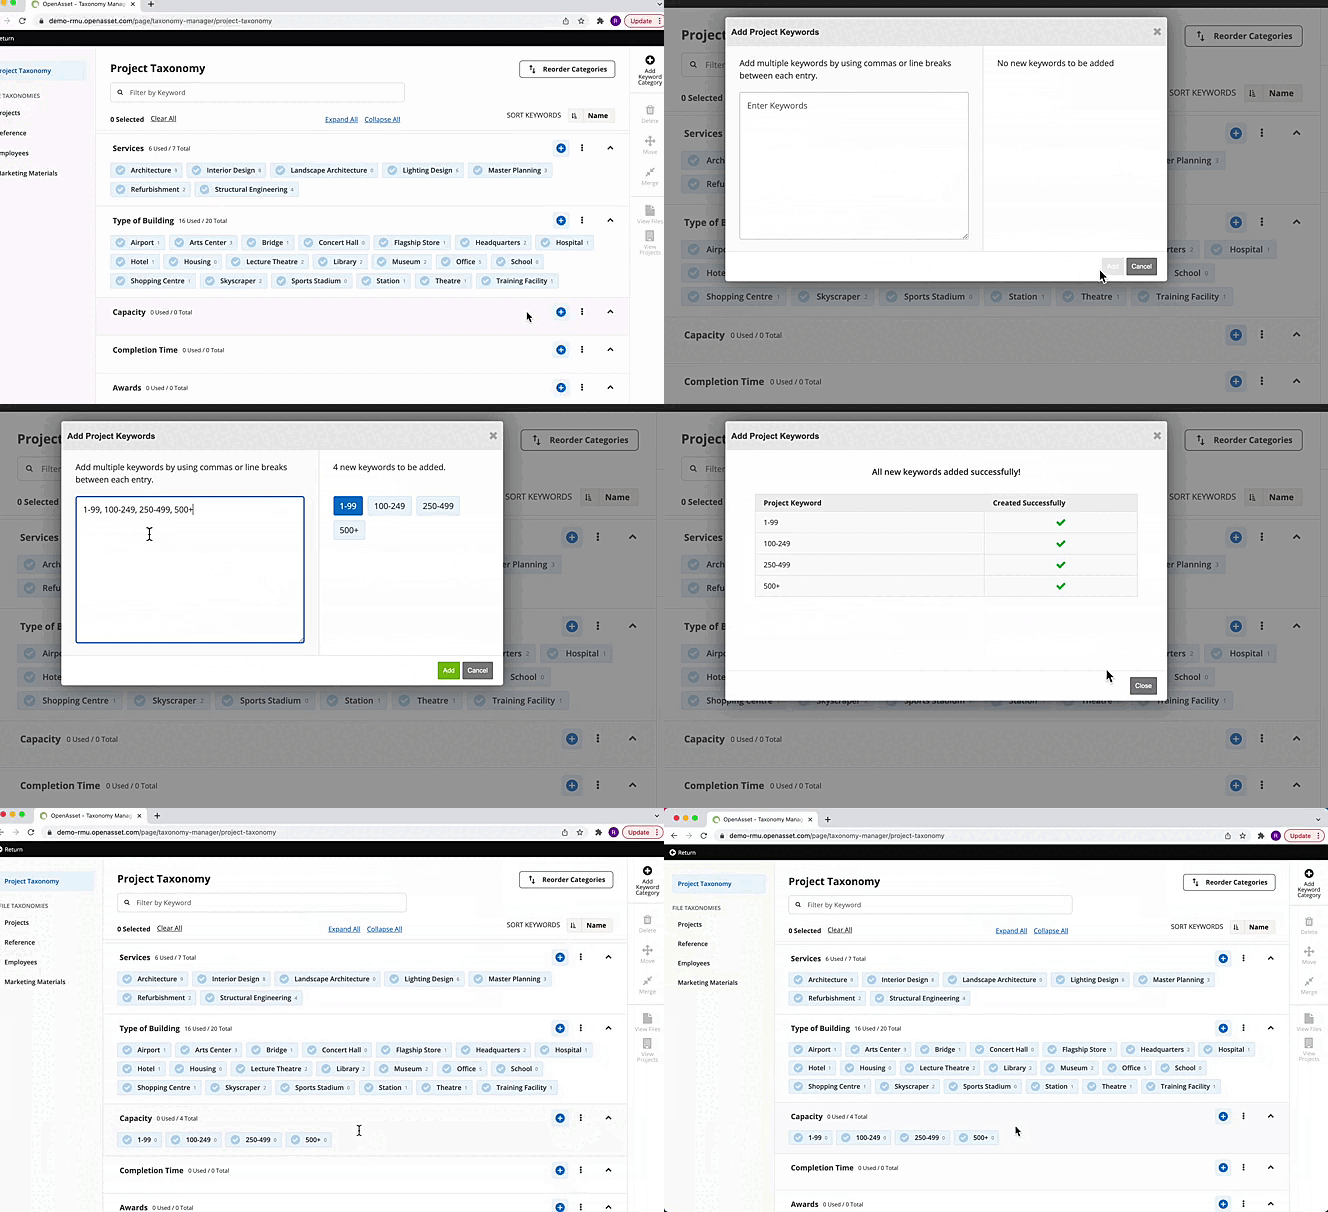
During your onboarding process, we will work with you to create your initial keyword list. However, you may realize you want to edit your keywords or add more keywords, or keyword categories at a later date. There are two ways to achieve this. The first is via the Taxonomies page, where you can add or edit both Keywords and Keyword Categories. The second is via the File/Project page itself. The below screen recordings highlight the different ways you can do this:
Navigating to your Taxonomy Page and Differentiating Between Project & File Keywords
Adding Keyword Categories
Adding Keywords from the Taxonomy Page
Adding Project Keywords from the Project Keywords tab
You can add keywords from the Project Keywords tab in two ways:
Option 1 is by adding Keywords using the ‘+’ icon next to the relevant Keyword Category. You will then need to attach these Keywords to the project after creating them.
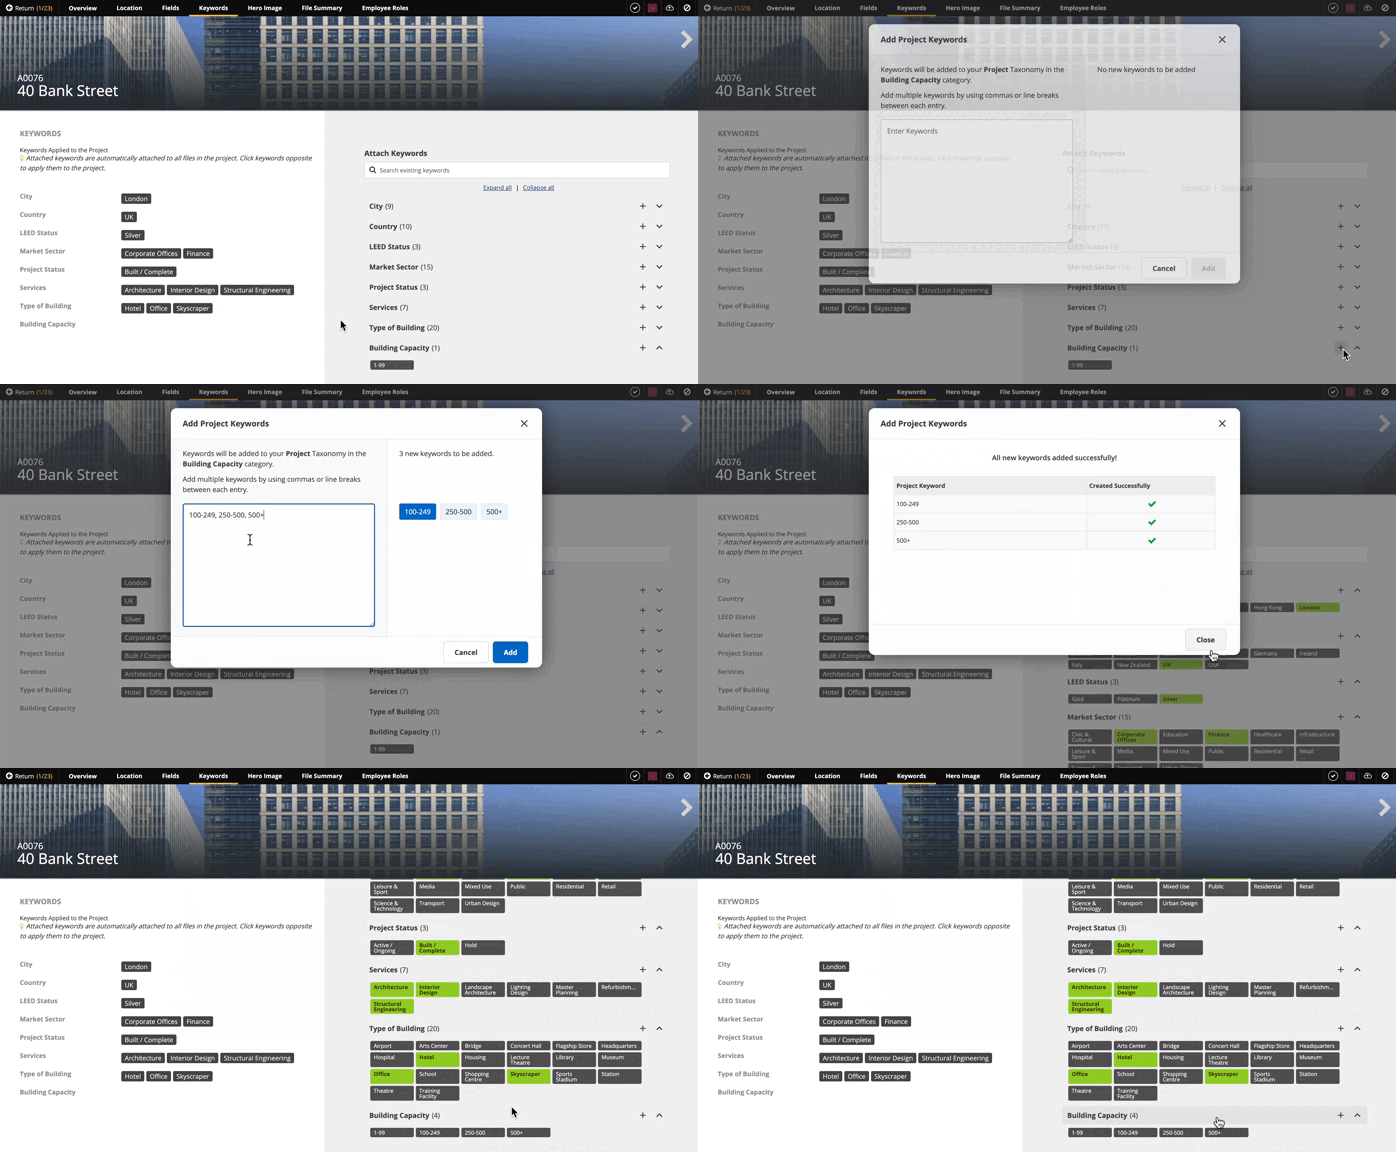
Option 2 is by adding Keywords from the search bar when there is no Keyword that matches your search term. You will then need to add the Keyword to a suitable Keyword Category.
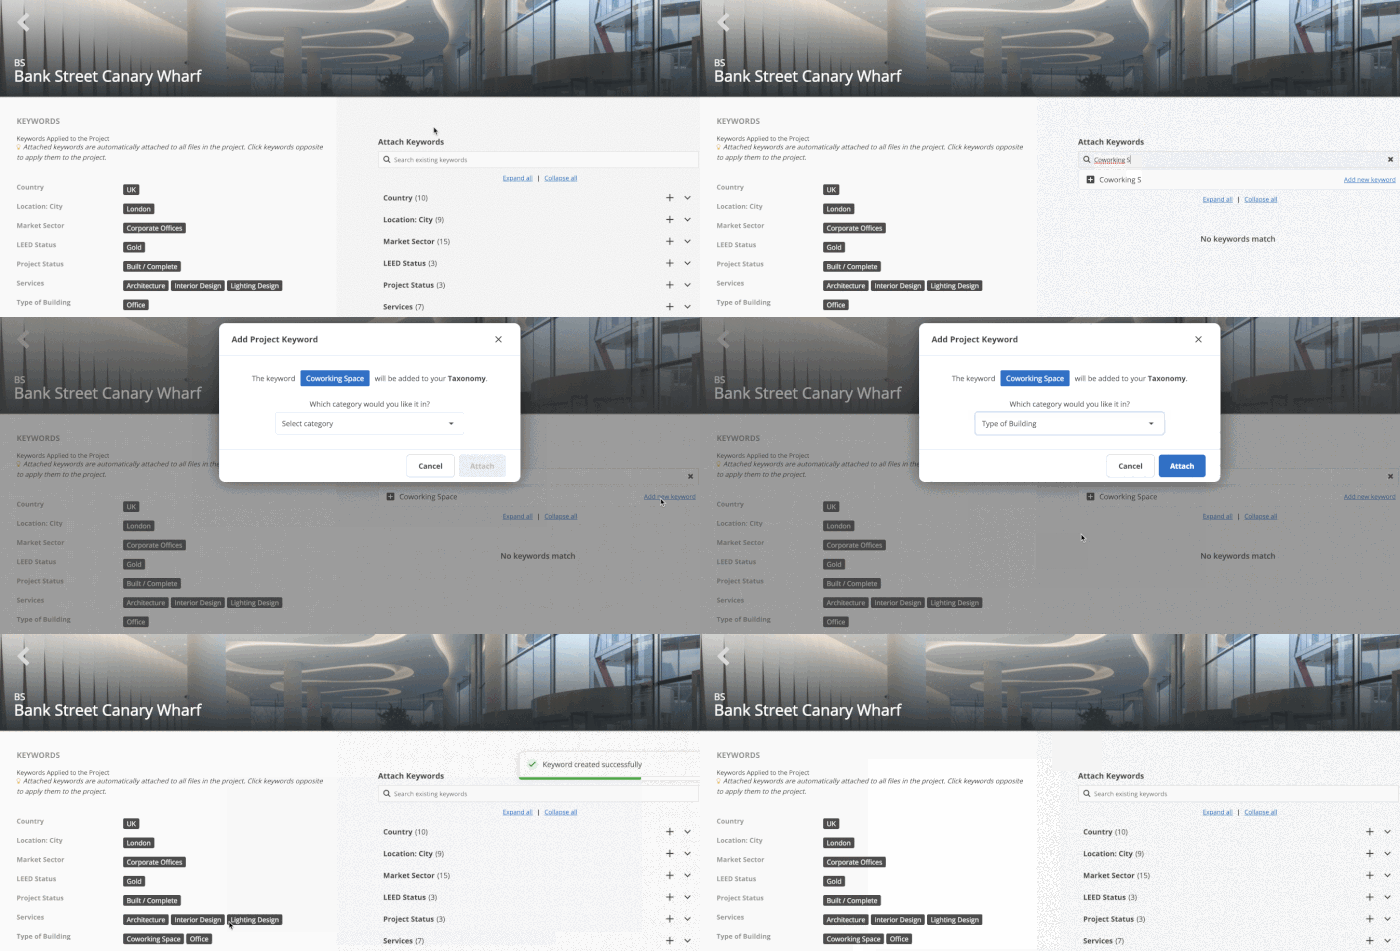
Adding File Keywords from the File Info Page
There are three ways you can add new Keywords from your File Info Page. These three ways are listed in detail, here.
For a more detailed, step-by-step explanation of how to navigate, create and edit or delete keywords, this article gives a comprehensive overview.
Custom Field Best Practices
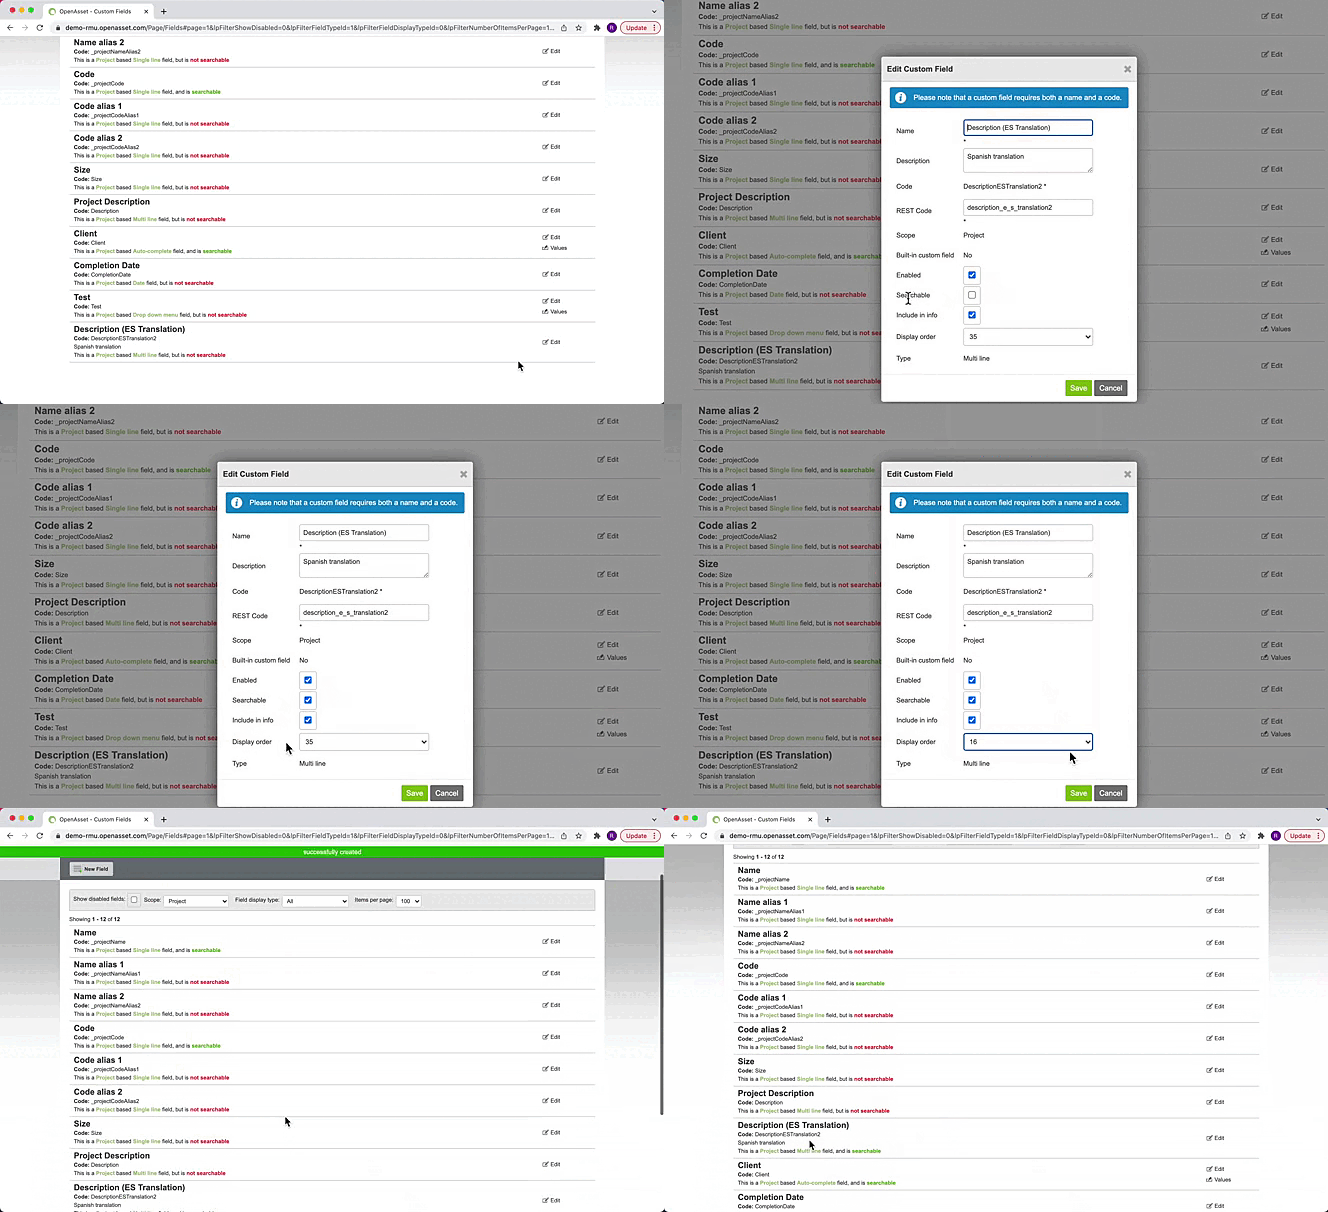
Whereas keywords tag projects or files with singular words or phrases, fields offer a way to add open-ended data to your projects or files. On top of giving context to your images and videos within OpenAsset, field data can also be fed into your templates, helping to automate the creation of your documents. Additionally, field data can help the discoverability of your files, as it can be searched via the search bar or filter menu. A caveat to this is that the field must be toggled as ‘searchable’ (see how in the ‘editing fields’ screen recording below). Because fields add context to your files, improve their accessibility, and contribute to document creation, it’s essential they can be customized for your needs. Below are some best practices to consider:
- Consider your end use cases. When customizing your fields it’s important to bear in mind the end use case. In most circumstances, this would be the creation of a document, such as a case study, brochure, or bid proposal. Then think backward as to what might be important to capture in order to aid the creation of these documents. For example, your firm may create these documents for global pitches, and therefore creating multiple language fields can automate document creation across pitches. Alternatively, perhaps some documents, such as a brochure, require a short overview of a project, while others, such as a case study, need a detailed description. Creating short and long ‘project descriptions’ allows you to quickly embed these different formats into your templates.
- Deleting fields may affect templates. On the topic of considering your end use-cases, it’s important to bear in mind that deleting custom fields may impact the formatting of your document templates. For this reason, it’s important to carefully plan out which fields should feed into your templates, and which shouldn’t. Don’t stress though – we can always work with you on this!
- Don’t be afraid to be specific. Unlike keywords, where we recommend you to not be too granular, you should certainly be specific with your field data. Remember, this data feeds directly into your documents, and your prospective clients expect to see the details.
- We’re here to help. Configuring custom fields in your system can have unintended consequences for your system, and as such we always recommend discussing changes with our Support Team or your CSM before making changes.
Creating Custom Fields
Note that you will need admin rights in order to manage your firm’s custom fields.
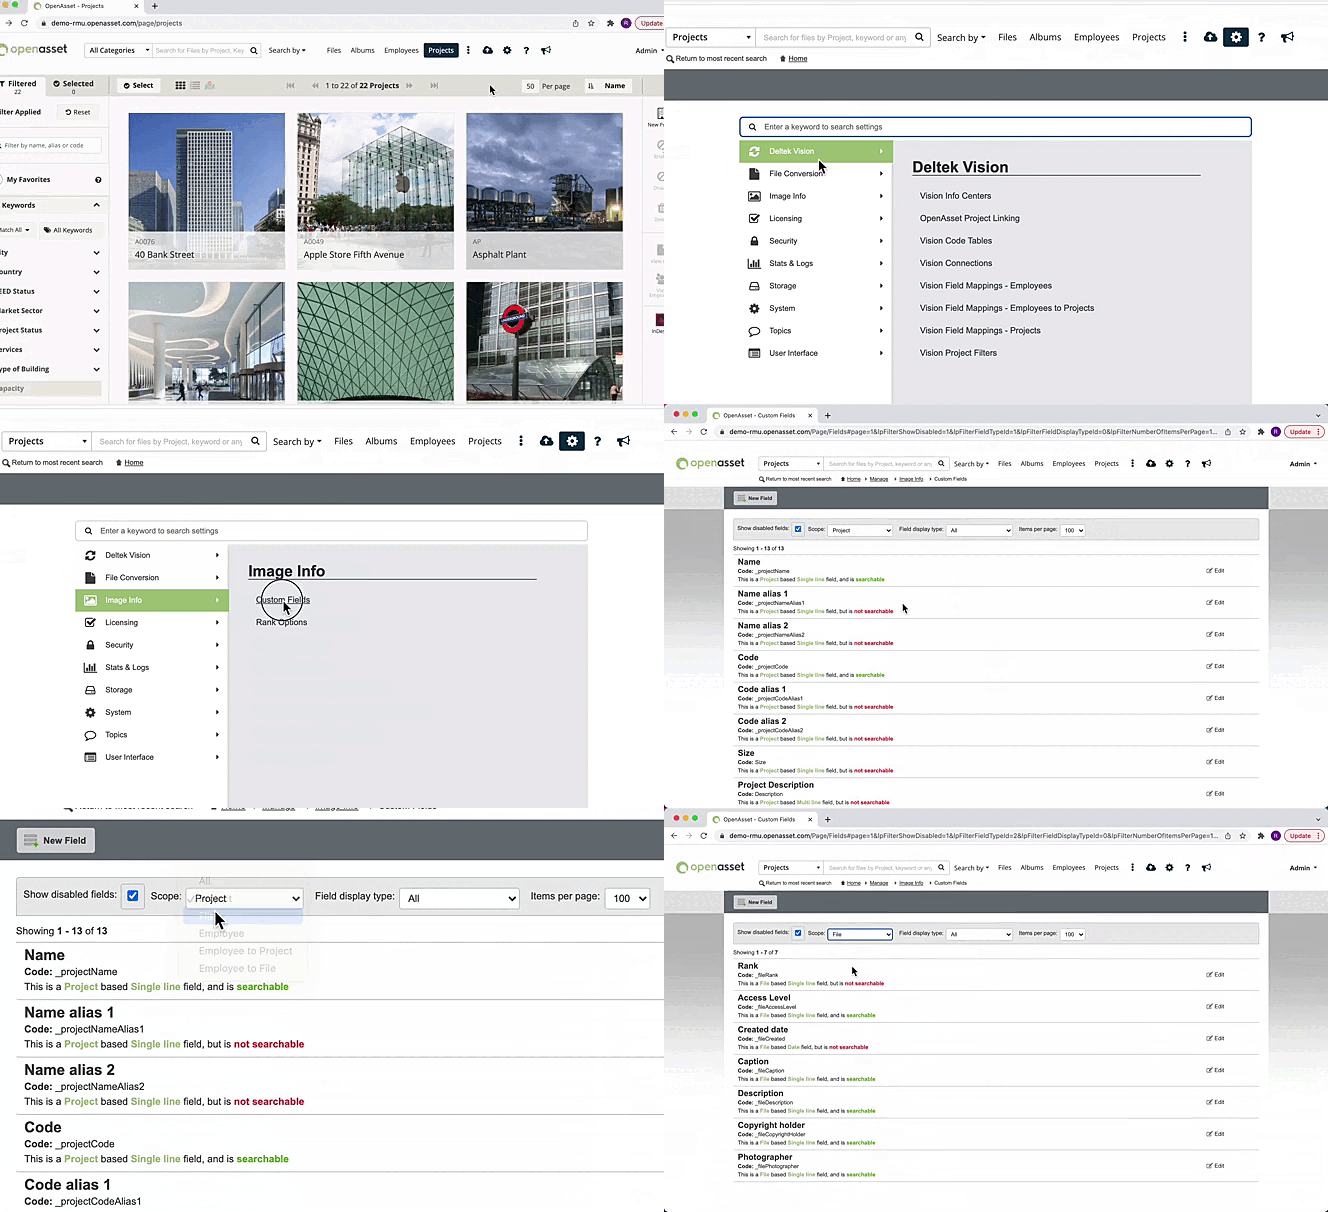
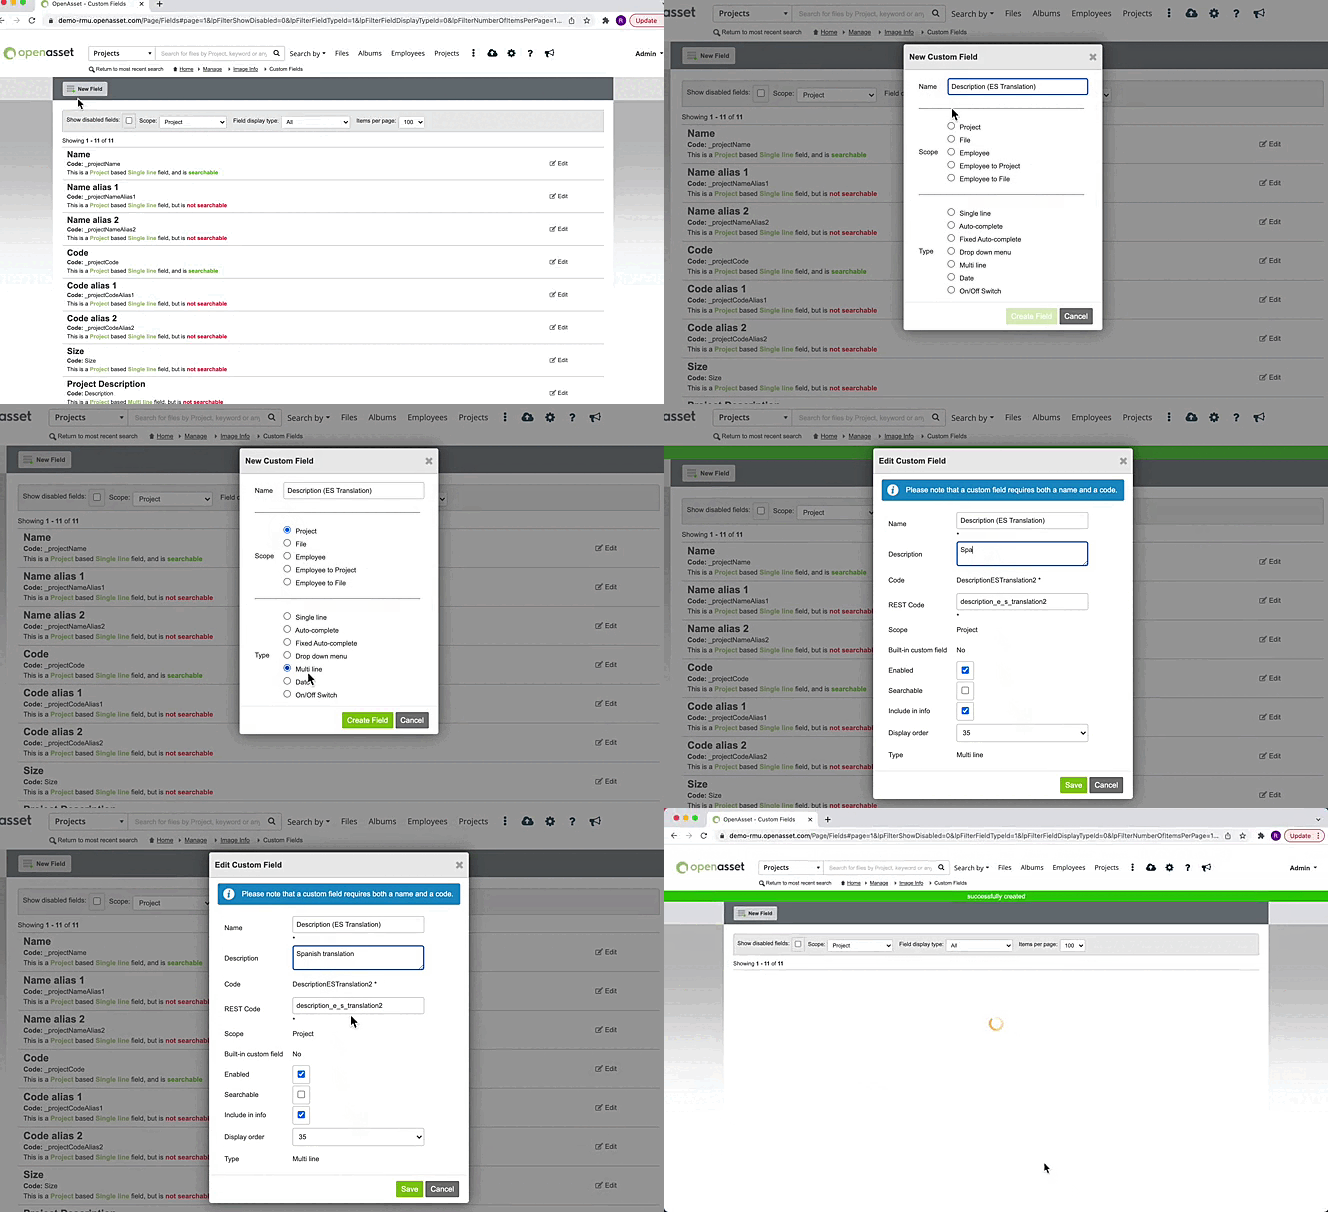
Just as we will help you set up your initial keywords, we will also help you create your custom fields. But for when new use-cases occur, the below screen recordings are on-hand to help you create new fields, or edit existing ones.
Navigating to Custom Fields & Choosing Scope
Adding Custom Fields
Editing Custom Fields
For a more detailed, step-by-step explanation of how to navigate, create and edit fields, this article gives a comprehensive overview.
Getting Started
Creating or editing your custom keywords and fields can seem like a daunting task as it affects how your whole company interacts with your platform. However, our support team is always on hand to aid your efforts – whether that’s consulting you on your initial setup, or helping with ongoing changes.
If you think your platform could be better customized for your needs, don’t hesitate to get in touch with your dedicated CSM, or contact support here.

